Saturday, May 30, 2009
Trying to be Greener
Trying to Be Greener is doing this cool give away. Melissa of HoboCamp Handmade is giving away coffee cuffs to 3 winners. Just go to Trying to Be Greener for the details.
Sunday, May 24, 2009
May 24, 2009

Because tomorrow is Memorial Day and that marks the beginning of all things summer, all of my favorite things this week have to do with summer activities.
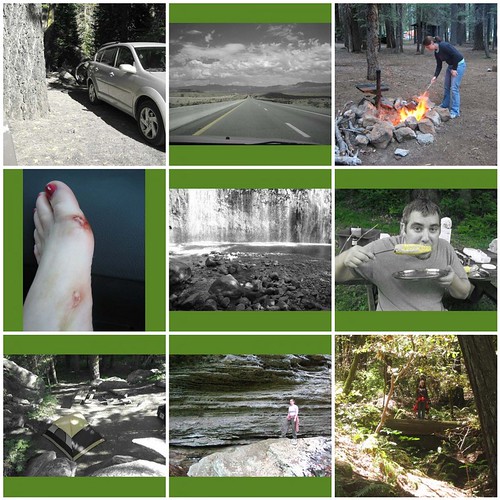
1. Vibe, the best road-tripping vehicle!, 2. Road Trip!, I love a good trip in the car. 3. Camp Fires!, smell so good and the heat is always so nice on a chilly evening. 4. That the scar from this..., 5. ....reminds me of this place, Dunsmuir Falls, Dunsmuir, CA. 6. Camp Fire Grilled Corn, is the best! See the photo description on my flickr for the recipe. 7. A good campsite, this one is one of the best. It's in Yosemite. 8. Summer Hikes, this one in Arkansas. 9. Muir Woods Hike, one of my favorite places.
Friday, May 22, 2009
Dream Quilt
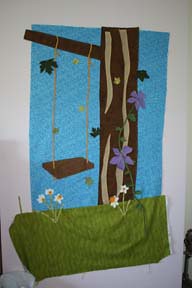
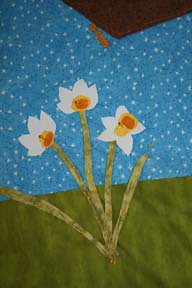
I wanted to share a little about my main current project. One of my very good friends from home (Omaha), Amber, is pregnant with her first baby. Very soon after she called to tell me she was having a baby, I had a dream about this quilt. My dream was about a baby quilt with a giant tree on it. Hanging from a limb in the tree, was a swing.
So, since this is the first dream I've ever had about a quilt I debated how to make this quilt. I thought about it for weeks. How to construct something like this? I didn't have a clue. Finally, when I was home over Mother's Day weekend, my mom showed me a book she had checked out from the library. That book, Applique the Basics and Beyond: The Complete Guide to Successful Machine and Hand Techniques with Dozens of Designs to Mix and Match, sparked the answer in my mind.
Here's a few photographs of the quilt currently. I am going to replace the purple clementis with a better fabric I purchased last night. I am planning to add 3 little birds at the top: a mama, a daddy, and a baby. I'm thinking this quilt needs some sort of butterfly in it. I am going to add a yellow border with girlie dragonflies and use a medium purple for the binding. Now the tricky part... deciding what to do on the back. I am planning to machine quilt it by following the shapes on the quilt top. Thus, the tree will be quilted in brown thread and will have a texture given to it to mimic bark. I think I'll follow the swirls in the blue sky so that the back of the quilt has a lot of movement.

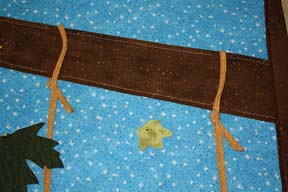
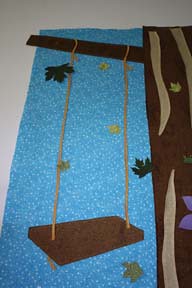

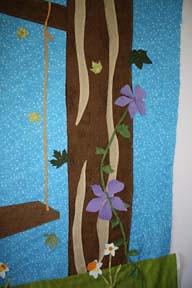
So, my current debate is what to use on the back. I am pretty set on a flannel and am thinking a solid color would be best. I want the different colored threads from the quilting to show on the back, so hopefully it will read as a tree and flowers. I'm thinking a bright white, but that will show dirt so quickly. My next thought is a cream, but I'm not sold on that. So, the great debate continues.
Note: I have only basted and pinned things into place currently. The thread and pins you see in the final quilt will not be there.
So, since this is the first dream I've ever had about a quilt I debated how to make this quilt. I thought about it for weeks. How to construct something like this? I didn't have a clue. Finally, when I was home over Mother's Day weekend, my mom showed me a book she had checked out from the library. That book, Applique the Basics and Beyond: The Complete Guide to Successful Machine and Hand Techniques with Dozens of Designs to Mix and Match, sparked the answer in my mind.
Here's a few photographs of the quilt currently. I am going to replace the purple clementis with a better fabric I purchased last night. I am planning to add 3 little birds at the top: a mama, a daddy, and a baby. I'm thinking this quilt needs some sort of butterfly in it. I am going to add a yellow border with girlie dragonflies and use a medium purple for the binding. Now the tricky part... deciding what to do on the back. I am planning to machine quilt it by following the shapes on the quilt top. Thus, the tree will be quilted in brown thread and will have a texture given to it to mimic bark. I think I'll follow the swirls in the blue sky so that the back of the quilt has a lot of movement.
So, my current debate is what to use on the back. I am pretty set on a flannel and am thinking a solid color would be best. I want the different colored threads from the quilting to show on the back, so hopefully it will read as a tree and flowers. I'm thinking a bright white, but that will show dirt so quickly. My next thought is a cream, but I'm not sold on that. So, the great debate continues.
Note: I have only basted and pinned things into place currently. The thread and pins you see in the final quilt will not be there.
Tuesday, May 19, 2009
Happy Anniversary....
to me!
Jason and I have been married for 2 years today! Wow! It seems like it should be at least 8 by now.
Here's a few photos for you to enjoy...


Jason and I have been married for 2 years today! Wow! It seems like it should be at least 8 by now.
Here's a few photos for you to enjoy...
Thursday, May 14, 2009
Row Robin Swap - "Green Christmas"
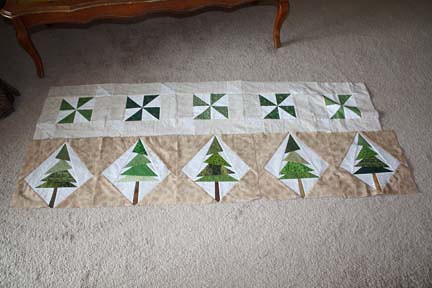
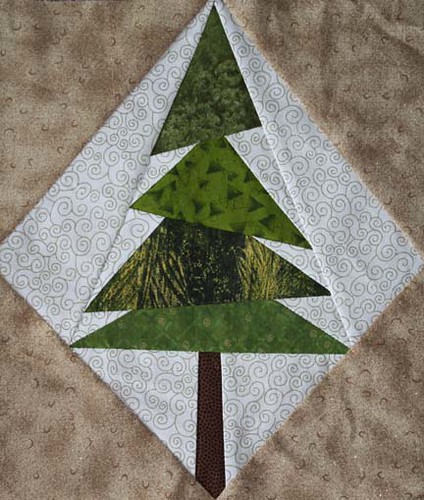
Valerie in my row robin swap has chosen a "Green Christmas" theme for her quilt. This is the row I had to complete between April 1st & May 15th. Well, it's done and has already been sent off!
Wednesday, May 13, 2009
International Quilt Museum
Over the weekend I went up to Nebraska to spend Mother's Day with my mom. On Saturday, we had to make a run to Lincoln because the diamonds in my wedding ring were starting wiggle. Jason purchased my engagement ring at a local place, so we bought my wedding band there, too. Unfortunately, I have to bring it back to them to have it fixed under warranty. My mom brought her original wedding ring along to see if they could replace her missing diamond and re-tip her prongs. She was so excited that they could fix it because it's been probably 10 years or so since she's worn her original set.
After we left the jeweler, we headed to my sister's place of residence. She is moving back to Omaha and we loaded up the car with a bunch of stuff.
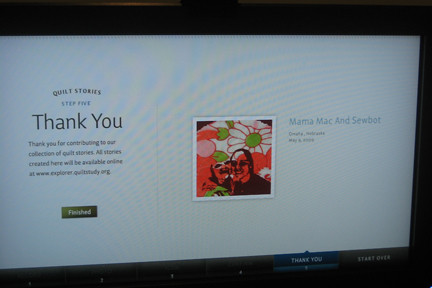
After stopping at Katie's house we headed over to the International Quilt Study Center & Museum. It was pretty cool. The main current exhibit is titled Chintz Applique: From Imitation to Icon. There was also a smaller exhibit titled Grace Snyder: A Life in Extraordinary Stitches. Unfortunately they don't allow photographs in the galleries, so I can't show you any of my own photos. There are however, a few photographs if you follow the links I've included to the individual gallery web pages.
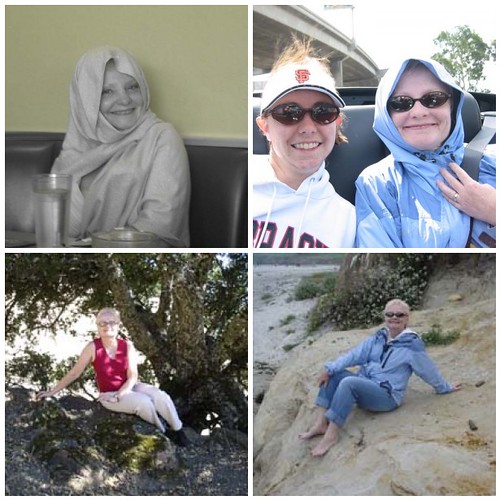
In the virtual gallery at the museum, there was a sound booth with a big t.v. and camera. You were supposed to make a video about your quilt story; what you saw at the museum, why you came, if you quilt, etc. You can see the video we made together about our quilting story if you click here.
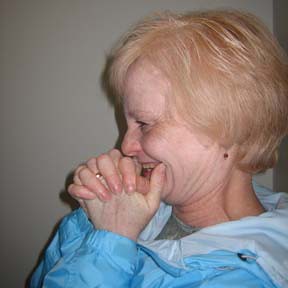 The picture above is of my mom giggling uncontrollably. We were very entertained by the movie making.
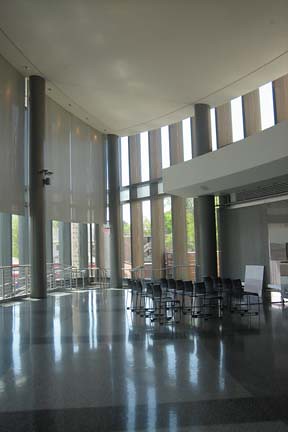
The Quilt Museum is a pretty cool place. When Jason and I lived in Lincoln, we were able to watch them in the initial building stages. We moved before it opened, but it was fun to see them construct it and then go back now to see the finished structure. Here are a few photos of the inside atrium sort of space.
Isn't the signage they made for the museum pretty cool? It is a piece of glass that is frosted to resemble different quilt patterns.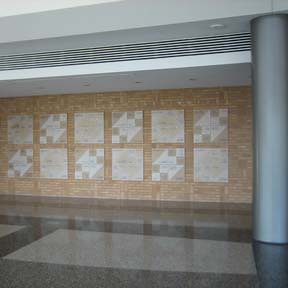
After leaving the quilt museum, we went to three quilt shops: The Cosmic Cow, The Quilted Kitty, and The Calico House. The Quilted Kitty sits in a neat old house and had all sorts of fabric crammed in. The Calico House had all sorts of fabric, was nicely arranged, and had reasonable prices. The Cosmic Cow was my favorite. It sits in an old building in the Havelock neighborhood and was staffed by a nice gentleman and his little dachshund. They had a wonderful selection of fabric. It took us two trips around the store just to see everything. I highly recommend this store if you happen to visit Lincoln, NE.
On Sunday morning, my dad and I took the dogs to the park and got ourselves some donuts. We dropped the dogs off and headed to Menard's for some siding to put on the garage. After we got back, we had some lunch and then my mom and I rushed to Sam's and Hancock before my grandparents were due to arrive. I now have a Sam's card. We needed to make a stop at Hancock, because I bought the rest of the bolt my store had of a specific blue for the baby quilt I'm working on.
So, I stuck around Omaha until after dinner and drove home Sunday evening. It was definitely a fun filled weekend!
After we left the jeweler, we headed to my sister's place of residence. She is moving back to Omaha and we loaded up the car with a bunch of stuff.
After stopping at Katie's house we headed over to the International Quilt Study Center & Museum. It was pretty cool. The main current exhibit is titled Chintz Applique: From Imitation to Icon. There was also a smaller exhibit titled Grace Snyder: A Life in Extraordinary Stitches. Unfortunately they don't allow photographs in the galleries, so I can't show you any of my own photos. There are however, a few photographs if you follow the links I've included to the individual gallery web pages.
In the virtual gallery at the museum, there was a sound booth with a big t.v. and camera. You were supposed to make a video about your quilt story; what you saw at the museum, why you came, if you quilt, etc. You can see the video we made together about our quilting story if you click here.
The picture above is of my mom giggling uncontrollably. We were very entertained by the movie making. The Quilt Museum is a pretty cool place. When Jason and I lived in Lincoln, we were able to watch them in the initial building stages. We moved before it opened, but it was fun to see them construct it and then go back now to see the finished structure. Here are a few photos of the inside atrium sort of space.
Isn't the signage they made for the museum pretty cool? It is a piece of glass that is frosted to resemble different quilt patterns.
After leaving the quilt museum, we went to three quilt shops: The Cosmic Cow, The Quilted Kitty, and The Calico House. The Quilted Kitty sits in a neat old house and had all sorts of fabric crammed in. The Calico House had all sorts of fabric, was nicely arranged, and had reasonable prices. The Cosmic Cow was my favorite. It sits in an old building in the Havelock neighborhood and was staffed by a nice gentleman and his little dachshund. They had a wonderful selection of fabric. It took us two trips around the store just to see everything. I highly recommend this store if you happen to visit Lincoln, NE.
On Sunday morning, my dad and I took the dogs to the park and got ourselves some donuts. We dropped the dogs off and headed to Menard's for some siding to put on the garage. After we got back, we had some lunch and then my mom and I rushed to Sam's and Hancock before my grandparents were due to arrive. I now have a Sam's card. We needed to make a stop at Hancock, because I bought the rest of the bolt my store had of a specific blue for the baby quilt I'm working on.
So, I stuck around Omaha until after dinner and drove home Sunday evening. It was definitely a fun filled weekend!
Tuesday, May 12, 2009
Nancy Brenan Daniel
I mentioned her website in the Saturday Night Sampler blog a little while ago, but I came across the business card I picked up from Nancy Brenan Daniel and thought it was worth sharing again and warranted a post of its own.
She's got a blog and all sorts of random information that could be good if you are looking to become a quilting teacher.
She's got a blog and all sorts of random information that could be good if you are looking to become a quilting teacher.
Sunday, May 10, 2009
Saturday, May 9, 2009
Introducing...
The blog Thisismamamac
It's a new blog my mom started recently.
It's pretty new, but I still think it's pretty cool. How fun is it that my mom has a blog?!
Anyway, it can be found at Thisismamamac.blogspot.com
Check it out. Surely, she'll add photos and stories about things she's making (and she makes some pretty cool stuff).
Friday, May 8, 2009
Karen's Quilt & Bead Shop
Here's another website I found while at the Quilt Festival. Karen's Quilt & Bead Shop has a great selection of fabric, patterns, beads & trinkets.
I recommend checking it out. You might find something you can't live without.
I recommend checking it out. You might find something you can't live without.
Thursday, May 7, 2009
Wednesday, May 6, 2009
Saturday Night Sampler
While in Chicago, Jason and I attended the Saturday Night Sampler. We learned all sorts of things. The sampler on Saturday night included 14 different exhibitors. Each exhibitor was given a table to set up their displays and there were several chairs lined up so the attendees could sit for a five minute presentation by the exhibitor. Each attendee was given a packet of handouts from each instructor so they could take notes and have a good reminder of what was presented.
A woman named Marilyn Doheny did a little lecture about Tantalizing Tango! Here are some of the displays she had at her table.
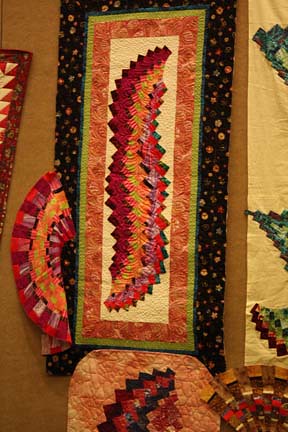 The quilt in the borders and the fan to its left were both made using the same beginning strip.
 You can make butterflies using her method.
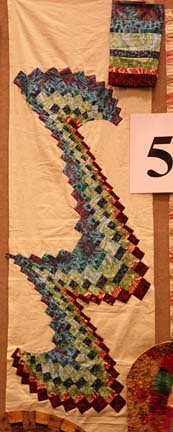 The strip in the top right of the photo is the strip that she made first. She then used the special ruler to slice it and create the quilt in the photo. Pretty cool, eh?
She was a lot of fun to listen to. It was almost like watching a really excited infomercial seller. By using her special rulers and shifting them a certain way across your already made rows, you can end up with one of these sort of quilts.
Debbie Caffrey did a little demonstration on how to do perfect & painless half-square triangles. I enjoyed her presentation and thought her method was so awesome, I bought her book Becoming A Confident Quilter: Perfect and Painless Half-Square Triangle Units and a 4" square rotary ruler. Her website can be found here.
One of the other presentations we sat through was by Darcy Berg on Painting Fabric. She did a quick demonstration on how to paint your fabric using Setacolor paint. It was a pretty neat little demonstration and I learned quite a bit. She showed us how to dilute the paint, apply it to the fabric and mentioned a few different things you can do to get a different effect. Did you know if you put salt on the fabric before you paint it, you get little spot marks? You can find her blog here.
We sat through the lecture by Nancy Brenan Daniel on how to stencil and applique quilts. It was pretty cool. It's amazing how much you can do with a stencil and get it to look like an appliqued quilt. She had an example quilt there that had been stenciled, feathered, and appliqued. Did you know pen-stitching is when you draw a dashed line along the edge of a stenciled image and it looks like you stitched it with thread? It turns out really bold. You can find her website here.
The last demonstration we watched was by Glennis Dolce. It was called the Stitched Manipulation of Pleated Shibori Ribbon. This ribbon was pretty neat. She did a demo where she made a flower out of the ribbon. It was really cool to see the way the ribbon opened up as she stitched it. You can visit her website here to see what exactly shibori is.
So that's a quick recap of one of the events we attended while in Chicago. Check back tomorrow for a website I discovered while in Chicago.
A woman named Marilyn Doheny did a little lecture about Tantalizing Tango! Here are some of the displays she had at her table.
The quilt in the borders and the fan to its left were both made using the same beginning strip. You can make butterflies using her method. The strip in the top right of the photo is the strip that she made first. She then used the special ruler to slice it and create the quilt in the photo. Pretty cool, eh?She was a lot of fun to listen to. It was almost like watching a really excited infomercial seller. By using her special rulers and shifting them a certain way across your already made rows, you can end up with one of these sort of quilts.
Debbie Caffrey did a little demonstration on how to do perfect & painless half-square triangles. I enjoyed her presentation and thought her method was so awesome, I bought her book Becoming A Confident Quilter: Perfect and Painless Half-Square Triangle Units and a 4" square rotary ruler. Her website can be found here.
One of the other presentations we sat through was by Darcy Berg on Painting Fabric. She did a quick demonstration on how to paint your fabric using Setacolor paint. It was a pretty neat little demonstration and I learned quite a bit. She showed us how to dilute the paint, apply it to the fabric and mentioned a few different things you can do to get a different effect. Did you know if you put salt on the fabric before you paint it, you get little spot marks? You can find her blog here.
We sat through the lecture by Nancy Brenan Daniel on how to stencil and applique quilts. It was pretty cool. It's amazing how much you can do with a stencil and get it to look like an appliqued quilt. She had an example quilt there that had been stenciled, feathered, and appliqued. Did you know pen-stitching is when you draw a dashed line along the edge of a stenciled image and it looks like you stitched it with thread? It turns out really bold. You can find her website here.
The last demonstration we watched was by Glennis Dolce. It was called the Stitched Manipulation of Pleated Shibori Ribbon. This ribbon was pretty neat. She did a demo where she made a flower out of the ribbon. It was really cool to see the way the ribbon opened up as she stitched it. You can visit her website here to see what exactly shibori is.
So that's a quick recap of one of the events we attended while in Chicago. Check back tomorrow for a website I discovered while in Chicago.
Tuesday, May 5, 2009
Creative Thinking for your Studio
Happy Cinco de Mayo!
While in Chicago, Jason and I both attended the Creative Thinking for your Studio class taught by Jenny Raymond.
We were so late getting there because we stayed with Jason's sister, Elle, who lives in downtown Chicago. Elle told us that the train would take around 40 minutes to get out by the O'Hare Airport. We left early that first morning thinking we'd have plenty of time to make it to the class and sign up. Unfortunately, there was construction on the train tracks, so we were delayed; it took us an hour to get to the Rosemont stop! So, we rushed to the convention center to be told the classes were being held through the never-ending tunnel in the Hyatt Hotel. We rushed through the longest tunnel in history to try to sign up for the class. Finally we made it to the sign up and were able to sign up quickly and run down to our class. Unfortunately, we were the late-comers and Jenny if you happen to stumble across this at some point, we apologize for running into your class late; it wasn't intentional.
When Meredith, my newest sewing machine, came and we rearranged our studio, we realized we had several issues to tackle.
1: We have very little storage space.
2: Jason has very little desk space.
3: We needed a better way to get ourselves organized.
So, we signed up for Jenny's class and got some great advice. Rather than keeping my large ironing board out all the time, the girls in the class suggested I make a small table top ironing board that I can use on the end of my desk.
The ironing board we plan on making will be out of either masonite or plywood. We'll cover it with a product called Insulbrite for insulation and then cover it with something kind of fun. By making this ironing board for my desk, we'll free up a huge bit of wall space for a design wall.
The design wall is made by using some of the thick pink rigid insulation (from your local hardware store) and covering it with either flannel or felt. You want to use the thick (2" or so) insulation so that you are able to push pins into it without causing too much trouble for your wall. I think I'll cover my design wall in a white flannel. I think the flannel has a softer look; it's not quite as harsh to look at as the felt is.
What is a design wall? It's a wall that you can stick (Yes! You just press your project up to the wall!) your blocks to arrange, clothing pieces to analyze, etc. Basically it's for everything that you need to look at from a distance and want to see all together. It's better than laying things on the floor or table because you can see the whole board at once by providing yourself with a little distance.
Another good suggestion I think people don't often think about is to use vertical storage, not horizontal. Get a tall bookcase rather than a short long one. Use shelving up high for things you don't use very often or things you want to display.
One thing that is a necessity for a good studio is lighting. The biggest problem I've had with our studio since our latest rearrangement is when I'm ironing in the evening and I can't see because the light is behind me. Lighting is key to a good studio!
So these are some of the cool tips I learned in our Studio arranging class. I hope they're a little helpful for you!
Monday, May 4, 2009
Publish your Patterns for Profit!
The last class I took at the Chicago Quilt Festival was Publish your Patterns for Profit also taught by Morna McEver Golletz, publisher and editor of Professional Quilter Magazine.
If you're interested in maybe publishing patterns in the future, read on.
This, too, was an awesome class with an overload of information. It was geared mostly towards people who have written a pattern and are looking for ways to increase their profit. I don't necessarily fall into this category, but I felt it gave me a head start so I'm not swimming in circles before I do it correctly.
One of the first major points discussed was how to grab your prospective buyer's attention. This can be done with some sort of Bonus! offer, maybe offer a hot tip for a the project. This almost always grabs the buyer's attention.
Some things that should always be included on a pattern cover:
-UPC
-Photograph of sample project
-Project Title
-Project Number or Code
-Your company name and contact information
The UPC doesn't have to be on the cover when you first start to sell items, but as your pattern business starts to grow, you will need to purchase them. You can get them at a discounted price at a place like upcexpress.com, but the part of the code that signifies who owns the UPC was sold to UPCExpress, so it doesn't point to your own company. If you want the part of the code to signify your company and not someone else, go to uc-council.org
One more thing to consider for your pattern cover is your future patterns. Do you want to create some sort of template now to use on future patterns? This will help streamline your patterns. If your logo, photograph, title, code and UPC information are always in the same spot and always done in the same font, there is no question about whether or not the same company did the different patterns. If someone buys one pattern of yours and likes it, they'll be more likely to buy another. If they can easily identify you buy your cover, it's even more likely that you'll get a repeat customer.
An interesting thing I learned in the class is that it takes $22,000 to self publish a book. Wow!
Some good resources that were given in the class were:
-uc-council.org
-Publish Your Patterns! by Nancy Restuccia. This book is apparently known in the Quilting Pattern World as the Green Book or The Bible.
-422 Tax Deductions for Business and Self-Employed Individuals by Bernard Kamaroff, CPA.
-The Creative Woman's Getting-it-all-Together-at-Home Handbook by Jean Ray Laury.
-The Basic Guide to Pricing Your Craftwork by James Dillehay.
Jason, if you read this blog post, replace the section above titled "Some good resources that were given in the class were" with "Books Jessica would like as gifts" and re-read.
Sunday, May 3, 2009

1. Popcorn, 2. Spices, 3. Hat, 4. Green Christmas Blocks, 5. Flowers, 6. Closet, 7. Closet Drawers, 8. Chopsticks, 9. Chopstick Rest
Descriptions of all photographs included in this week's Sewbot's Favorites can be found on my flickr.
Saturday, May 2, 2009
Baby Shower Invites
I think I mentioned a while ago that my best friend is having a baby. Well, we've reached the Baby Shower point in her pregnancy and I made the invites.
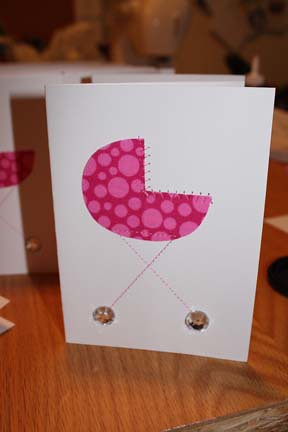
We decided on a pink theme. We're using a combination of dark/hot pink and light/baby pink. Amber is a pink sparkly kind of girl, so this is a good theme for her baby girl.

The fonts I chose for the title is called Curlz. I chose it because it was fun and cheerful. I chose Apple Garamond Light for the rest of the text because it is really clear and to the point. It has to be legible and communicate all the important details and I thought this was the right choice for the job. I also liked the way the two fonts mixed and complimented each other.
Not bad for a girl with only one graphic design class under her belt, eh?
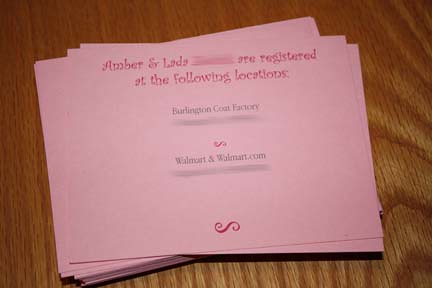
I used double stick tape to put these little inserts into the cards. They're taped onto the side opposite all the party information. I wanted to make an insert with the registry information and numbers on it so that the guest could pull in out of the card and stick it into her purse to take with her when she goes to buy a gift. Amber & Lada have a Czech last name, so I anticipated problems spelling it when the guest went to the registry machine. Hopefully this card will do the trick.
All 45 or so invites are in the mail. Phew! That was a lot of them and I can cross this off my to-do list. Yay!
*Personal information blurred for safety reasons.
We decided on a pink theme. We're using a combination of dark/hot pink and light/baby pink. Amber is a pink sparkly kind of girl, so this is a good theme for her baby girl.
The fonts I chose for the title is called Curlz. I chose it because it was fun and cheerful. I chose Apple Garamond Light for the rest of the text because it is really clear and to the point. It has to be legible and communicate all the important details and I thought this was the right choice for the job. I also liked the way the two fonts mixed and complimented each other.
Not bad for a girl with only one graphic design class under her belt, eh?
I used double stick tape to put these little inserts into the cards. They're taped onto the side opposite all the party information. I wanted to make an insert with the registry information and numbers on it so that the guest could pull in out of the card and stick it into her purse to take with her when she goes to buy a gift. Amber & Lada have a Czech last name, so I anticipated problems spelling it when the guest went to the registry machine. Hopefully this card will do the trick.
All 45 or so invites are in the mail. Phew! That was a lot of them and I can cross this off my to-do list. Yay!
*Personal information blurred for safety reasons.
Friday, May 1, 2009
May Day! May Day!
Happy May Day!
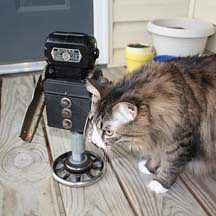
In honor of today being May Day, I'd like to introduce all of you to my new friend, Singer.
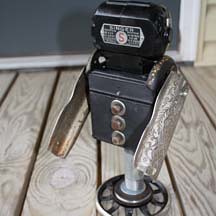
So far, Singer is getting along with everyone. She and Lily really seemed to hit it off. They like to hang out on the balcony together, chatting with the birds and watching the cars go by.
Our friends, Nick & Angela made her for me. They have a robot building business , Nerdbots, that they run out of the Arts Incubator in the Crossroads District of Kansas City.
If you go to the Adopt-A-Bot page of their website and click on Sold Robots, you can find Singer and the awesome photographs they took of her. You can also find the best part of this whole adoption process there too; her bio! She likes to make bows and shop on the Home Shopping Network!
How fun is that? Each of the robots they make comes with a back story.
If you happen to be in Kansas City tonight, there is the First Friday Art Walk in the Crossroads District and you can stop by and see Nick & Angela in the Incubator hanging out with all their robot friends. I recommend adopting yours today; they're all sorts of nerdy fun!
In honor of today being May Day, I'd like to introduce all of you to my new friend, Singer.
So far, Singer is getting along with everyone. She and Lily really seemed to hit it off. They like to hang out on the balcony together, chatting with the birds and watching the cars go by.
Our friends, Nick & Angela made her for me. They have a robot building business , Nerdbots, that they run out of the Arts Incubator in the Crossroads District of Kansas City.
If you go to the Adopt-A-Bot page of their website and click on Sold Robots, you can find Singer and the awesome photographs they took of her. You can also find the best part of this whole adoption process there too; her bio! She likes to make bows and shop on the Home Shopping Network!
How fun is that? Each of the robots they make comes with a back story.
If you happen to be in Kansas City tonight, there is the First Friday Art Walk in the Crossroads District and you can stop by and see Nick & Angela in the Incubator hanging out with all their robot friends. I recommend adopting yours today; they're all sorts of nerdy fun!
Subscribe to:
Posts (Atom)